# Upgrading to Smartnode v1.3.x
Version 1.3.0 of the Smartnode stack brings some important changes that users should be aware of. They are designed to significantly improve your node operator experience and address many of the features that our users have requested since Rocket Pool's launch.
In this guide, we'll walk you through the process of migrating from an older version of the Smartnode from an older version to v1.3.x and beyond.
# Configuration File Changes
v1.3.0 introduces some significant changes in the way the Smartnode's configuration is managed. If you've manually modified the Smartnode configuration before, you should be aware of the following changes:
The
config.ymlfile has been removed. All of its information is now baked directly into the Smartnode stack, so users can no longer accidentally modify the file in a way that prevented the Smartnode from working properly.- All of the user-configurable parameters that were previously part of it are now settings in the new
service configTerminal UI.
- All of the user-configurable parameters that were previously part of it are now settings in the new
The
settings.ymlfile has been replaced with a new file calleduser-settings.yml. This contains all of your settings for every user-configurable portion of the Smartnode.- This file is not meant to be modified directly. Modification should be done through the new
service configTerminal UI instead.
- This file is not meant to be modified directly. Modification should be done through the new
The
chainsfolder has been removed. The scripts for launching the Execution Client (ETH1), the Beacon Node, and the Validator Client now reside in thescriptsfolder.The
docker-composeYAML files have been removed. Each container now gets its own file in thetemplatesfolder. Uponrocketpool service start, these templates are filled out with your settings and put into theruntimefolder automatically.- Modifying the templates or runtime files is not recommended. Instead, fill in your container customizations using the override files for each container in the
overridefolder. These files will overwrite the Docker files inruntime, so you are free to customize them as you see fit. - The files in
overridewill persist upon Smartnode upgrades and reinstallation so you only need to create them once. - If you are interested in modifying the
docker-composefiles via this override mechanic, please see this section
- Modifying the templates or runtime files is not recommended. Instead, fill in your container customizations using the override files for each container in the
# Installing the New Version
Installing the new version should feel very familiar.
Start by stopping the services and downloading the new CLI as usual:
After the installation, all of your old configuration files will be moved to a folder named old_config_backup in your Smartnode directory (by default ~/.rocketpool/old_config_backup).
You can find them there if you ever need to refer to them for any reason.
If you are looking for instructions on reverting to v1.2.4 from this backup, please scroll to the Reverting to Your Previous Configuration section at the end of this page.
# Configuring the Smartnode with the Terminal UI
Now that you have the new CLI and package installed, all of your previous settings have been preserved and migrated to the new system.
In the next step, you should run rocketpool service config.
This will look quite different compared to previous versions of this function; v1.3.0 introduces the Terminal UI: a terminal-based dynamic user interface for configuring your Smartnode.
You must run it before starting the Docker containers after the migration process to view the configuration, verify that all of your changes were migrated successfully, and update any other settings that you desire.
When you first run it, you will be prompted with this greeting screen (if you were using Docker or Hybrid mode):
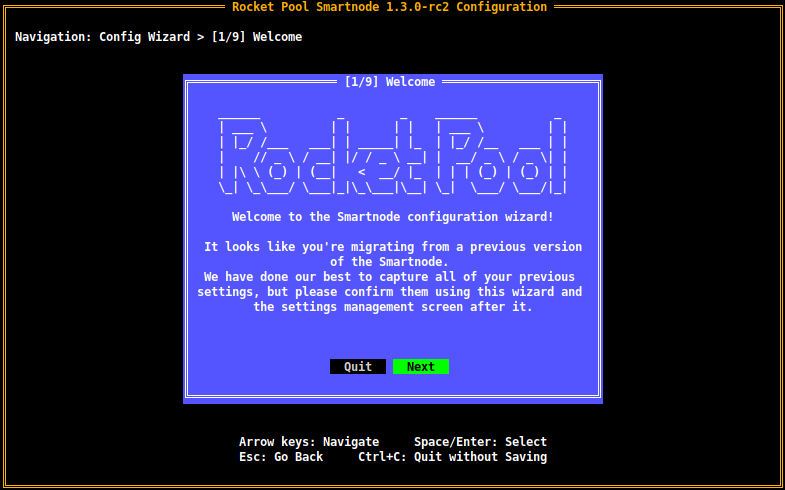
NOTE
Native Mode users will see this screen with slightly different wording, which states the Smartnode is operating in Native mode.
The TUI will begin with the Wizard, which allows you to quickly and easily change the most important parameters of the Smartnode (such as client mode and selection).
All of your previous settings should already be highlighted as you traverse through each page of the wizard so you don't have to remember what your previous configuration was off the top of your head.
NOTE
For a detailed walkthrough of this Wizard, please visit the following pages:
For Docker Mode, please visit the new Docker configuration guide.
Hybrid Mode users: Hybrid Mode is now a first-class feature of the Smartnode and configuring it is much easier than it used to be. Please visit the new Docker configuration guide and follow it. When you are prompted to choose an Execution client mode and Consensus client mode, choose Externally Managed for them accordingly.
For Native Mode, please visit the new Native configuration guide.
Navigate through this wizard and confirm that all of your settings are correct.
Once you are done, you will have the option of reviewing all of the settings before saving if you desire. This includes settings that the Wizard didn't cover, such as the RPL claim gas threshold or your max number of Geth peers as examples.
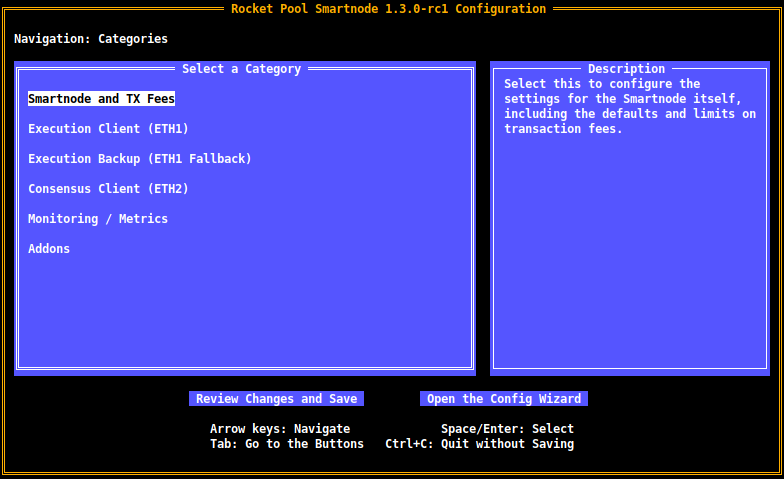
The main settings screen, which you should also look at to confirm your previous settings, will look like this (for Docker and Hybrid mode users):
NOTE
Native Mode users will see a slightly different screen that is unique to Native mode and only presents the settings that are relevant for it.
Feel free to explore this new UI and adjust any settings you see fit.
Use the Arrow Keys to navigate, and press Enter to enter a category or confirm any changes to a setting that you make.
Press Esc when you're finished editing a category to return to this home screen.
When you're ready to save your changes and start the Smartnode stack, simply press Tab to move down to the buttons at the bottom of the screen, select Review Changes and Save (by making it green via the arrow keys).
Press Enter to be brought to the Review Page, where you can see everything you've changed since the last time you ran rocketpool service config.
Confirm all of your change are present, and then press Enter again to save them.
The screen will show you which containers need to be restarted for the changes to apply, though since you're migrating, you've already turned the containers off and they will all be restarted anyway.
# Starting the Smartnode Stack
Once you've saved your configuration, the terminal will ask if you want to restart the containers automatically (unless you're using Native mode). If you do not / cannot allow them to start automatically, you can start them up manually with the following commands:
Once they're up, you can verify that everything is working as intended.
Use the rocketpool service version command to check that you have the correct version of the Smartnode and client containers:
$ rocketpool service version

Your Smartnode is currently using the Prater Test Network.

Rocket Pool client version: 1.3.0-rc1
Rocket Pool service version: 1.3.0-rc1
Selected Eth 1.0 client: Geth (Locally managed)
	Image: ethereum/client-go:v1.10.16
Selected Eth 2.0 client: Nimbus (Locally managed)
	Image: statusim/nimbus-eth2:multiarch-v22.3.0
Use the rocketpool service logs eth1 and rocketpool service logs eth2 commands to watch the logs for your Execution client (formerly ETH1 client) and your Consensus client (formerly ETH2 client).
Look out for any errors and please visit our Discord server for help (opens new window) if you encounter them.
# Reverting to your Previous Configuration
If, for any reason, you need to revert back to v1.2.4 of the Smartnode stack, don't worry! All of your old configuration files have been preserved in a backup directory and can easily be retrieved to restore your previous setup.
Select which mode you use from the tabs below and follow the instructions.